
During Death Year 2025 I acquired some TTcombat MDF terrain: an epic-scale industrial construct dubbed the Ashworks Foundry Ashford Pressureworks (I’ve written and said this name many times and still cannot get it right – senility is clearly setting in). I believe this is discontinued, though it’s still available via 3rd party sellers if you’re interested.
I believe it’s designed for TTcombat’s own game Dropzone Commander, which I’ve not played (interested, you know, but it involves a lot of resin, plus getting stuff from the UK is non-trivial these days) and is 10mm scale. I play Legions Imperialis which is 8mm scale, but what’s 2mm between friends?
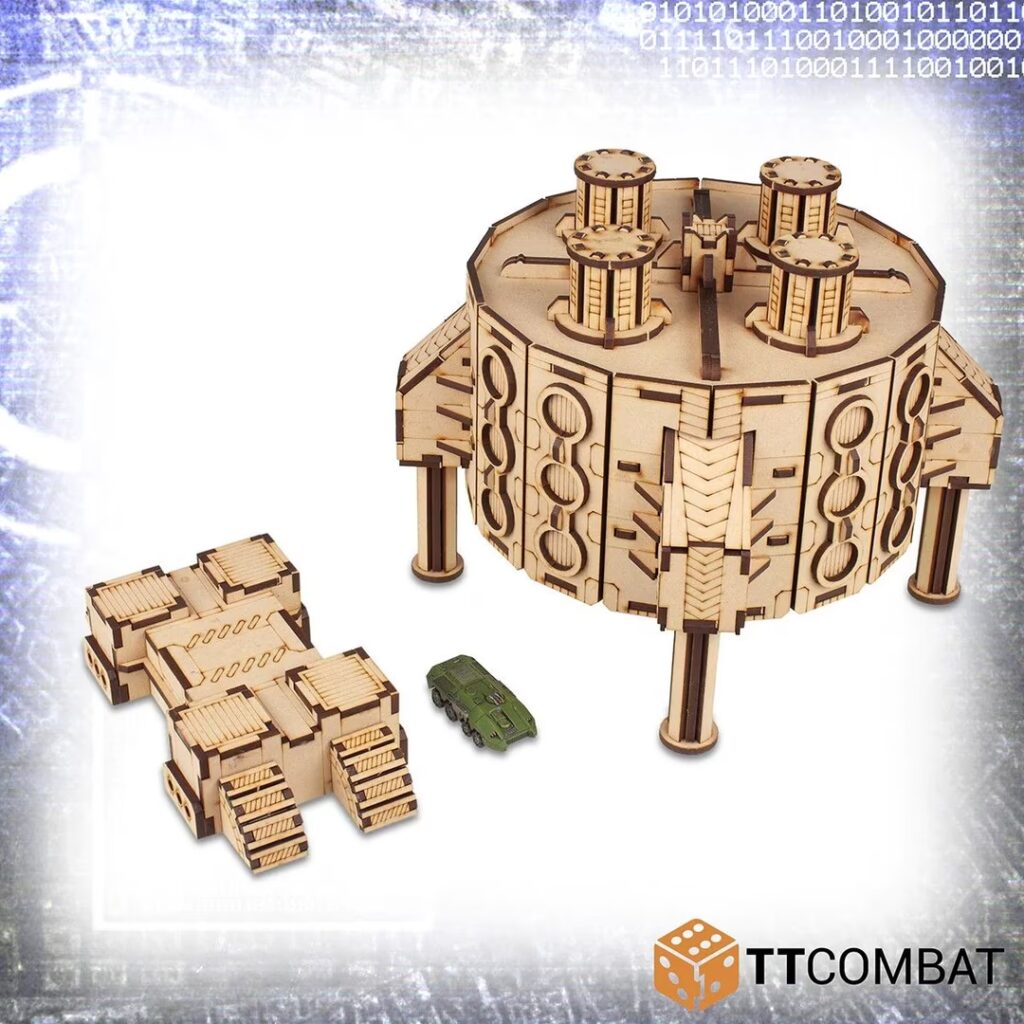
As that picture suggests it’s a sizable building (accompanied by a generator substation or control room), and I reckon it’s taller than most – possibly all – titans, the largest models available for Legions. I thought it would make a great centrepiece to play around, given that most of the scenery I currently have can’t fully block line of sight for the largest war machines in the game. Plus, it’s not a building encrusted with gothic crenation and spires, so it stands out from the crowd aesthetically.
I was intimidated by the construction process as my previous MDF builds, paint racks from greenstuffworld, were a real pain in the arse to make, constantly falling apart and demanding nightmarish alignment of multiple inserts simultaneously. Happily, once I eventually sat down to build this, it was considerably easier and a lot more fun than making shelves. It took me about six hours to build, all told. Were I to do it again I could be faster as I learned a few tricks along the way:
- When removing pieces, gently run a craft knife along straight edges on the underside of sheets where the laser cutting has left a perforated-looking surface. This both eases release and gives you cleaner edges.
- Most pieces have one, two or sometimes more uncut contact points to prevent them falling out of the sheets. Also using a craft knife, press down and cut through these points on both sides of the sheet to then easily remove the piece. Before I figured this out, I was using force to ‘snap’ them free, which resulted in ugly splintering and fraying.
- Always dry fit and test before gluing anything (even though you’re only using PVA).
- This build involved making lots of things four times; build one to learn the process, then batch construct the next three for efficiency.
- It’s good to do each building in one session, as glue that has not fully cured is more forgiving if you realise you made a mistake, or need to loosen something to get another piece in.
- Use coarse sandpaper to round the edges of inserts/pegs, especially in cases where you are fitting multiple pieces around a pseudo-disc as in this build. It won’t affect how well it holds together but it will make it easier to fit without breaking anything through excess application of force.
- Wear some kind of mask when sanding because wood particulate gets everywhere. If you have a little hand vacuum cleaner as well, that’s nice!
It’s largely obvious advice but, if you’re as new to this as I was, I hope it is helpful.
Here’s a photo of my finished build with some miniatures for scale. I screwed up one part – I misaligned the legs with the discs without thinking about how the crossbars and cylinders on top would fit in – but so far no one else has noticed, so pretend I never mentioned it. (My girlfriend suggests the top of the pressureworks rotates, and this accidental skew suggests a great old machine that has locked up out of age and poor maintenance – a very Imperium of Man take on it!)


I had planned to coat this in mod podge to seal it before painting, but got some friendly advice from the MS Paints discord server that PVA would do just fine. This did indeed do the trick, and where it was protected by PVA the black primer I applied went on beautifully.
Unfortunately, it turned out there were also plenty of areas where I had not gotten the PVA, and there the primer took hold less well, as the exposed wood ‘drank’ up the paint. Not to worry; this is a learning experience! Next time, I might mix some cheap craft paints in with my PVA so that it’s very obvious where there is coverage and where there is not. The colour won’t matter afterwards since I’ll be priming anyway. This time around, I manually slapped cheap black craft paint over the areas that needed it, and left that to dry.
As for the actual paint job… well, this project has already taken up about seven hours, and it’s just a big lump of wood to fight around. I don’t want to paint this to the height of my ability, and in fact I would like to aim to spend not much more than one more hour on it. So the plan, at the time of writing, was to make use of more cheap craft paints and sponges to very quickly stipple paint over it for texture, and hope that the small recesses cut into the wood retain the black primer to give the paint job some contrast around the detailing. My original plan was to do the flat surfaces in orange, with metallics to contrast where it feels appropriate, and then I’ll sponge on much smaller amounts of brown around the lower edges, and into crevices, to give the effect of dirt and grime.
Once I actually sat down to paint this about two weeks later, I ended up using make-up sponges rather than, um, ‘coarser’ sponges (the kind you use for washing up) to apply brown paint, rather than orange, to most of the surfaces. The craft paints I was using were low pigmentation and so multiple coats were needed, and the make-up sponges applied much more even and thin coats than my original plan. I think it was also much, much faster, once I got a sense of how much paint to get on them, and how to move and smooth it around before it cured to get a reasonable even finish.
I manually painted on a few coats of silver craft paint for some details, and a deep crimson for a few more details, to add some accents and points of interest. The silver pops, the crimson does not, but that’s fine – I want the models on the table around this to stand out more than the building itself.
Finally, I used an artist’s sponge – less coarse than make-up sponges, much coarser than the squishy make-up sponges, and mounted on a stick for convenience – to apply some highlights in a warm yellow.
I would have liked to layer up some orange over the brown, but just getting most of the brown and silver down exceeded my time budget. I decided to give it an extra hour, and that let me layer on more brown where needed, and do the red and yellow details.


I’m very happy with the final result here, and think these will look great on the tabletop. The main building is tall enough to allow movement underneath it, which could be interesting for infantry and small vehicles, while the substation could be garrisoned by infantry. After building and painting these, I’d happily add more MDF scenery to my collection.